Showing posts with label SilhouetteCameo. Show all posts

Monday, April 14, 2014

Join the Card Drive for Lauryn.....


Isn't this little girl just precious? Let me introduce you....
Lauryn was diagnosed with Leukemia on March 27, 2014. She is currently hospitalized in the DC area undergoing chemotherapy to fight this terrible disease.  Lauryn is Linda Payne's granddaughter...many of you in the stamping community probably already know sweet Linda!

As news of Lauryn's illness spread via social media, many of you have asked if there is anything you can do to help, so we have come up with a plan. We decided to have a Card Drive and would like to invite YOU to help by sending "happy mail" to Lauryn and her family.

Please create cards to share your love and encouragement for Lauryn and her family. Lauryn's parents are Josh and Elizabeth and she has two older siblings: Lily and Logan. We thank the Lord for this dear family and need to pray for them as they are seeking to glorify the Lord throughout this trial. 

Cards can be mailed to:

Children's National
Hematology/Oncology RM 437
Lauryn Newsome
111 Michigan Ave NW
Washington DC 20010

You can find updates on Lauryn via a Facebook page that has been set up by some family. It is Fight on Little Lauryn. They have shared how encouraging it is receive a simple "like" on a Facebook status or words of love and encouragement that is posted.
Here is the fabulous group of bloggers who have joined us in promoting this Card Drive. We would love for you to hop with us as numerous bloggers have blog candy and all you need to do is leave a comment... 

Olga Jewell Craftieodamae
Mary Anne Kelemen Lakeside Stamping
Lisa Haines The Purple Place
Colleen Holmes A Card’s Delight
Anita Autore Cards & Coffee 
Sandra Van Blaricum Cards and Creativity 
Nina Brackett Crafting in Croatia
Linda Coughlin The Funkie Junkie
Kathleen Curry Will Stamp for Wine
Melissa Czapor My Many Journeys
Vicki Dutcher All I Do is Stamp
Tera Fujan Stamp Queen 
Joy Hadden Pieces of Joy
Karen Knegten Studio at the Lake 
Lee Murphy My Reality
Betty Neville Betty Neville's Blog
Jackie Randolph Paper Moments 
Shirley Ross Card Art, Etc.
Brenda Turner Stamp It Up
Geri Utterback Geri’s Cards 
Cheri Weston Stamp’n Boomer 

and speaking of blog candy, this is what I am 
offering here on my blog---you just need to 
leave me a comment either saying you will 
send sweet Lauryn a card (doesn't have to 
be handmade) or will make a donation to her
family and I will put your name in the running.


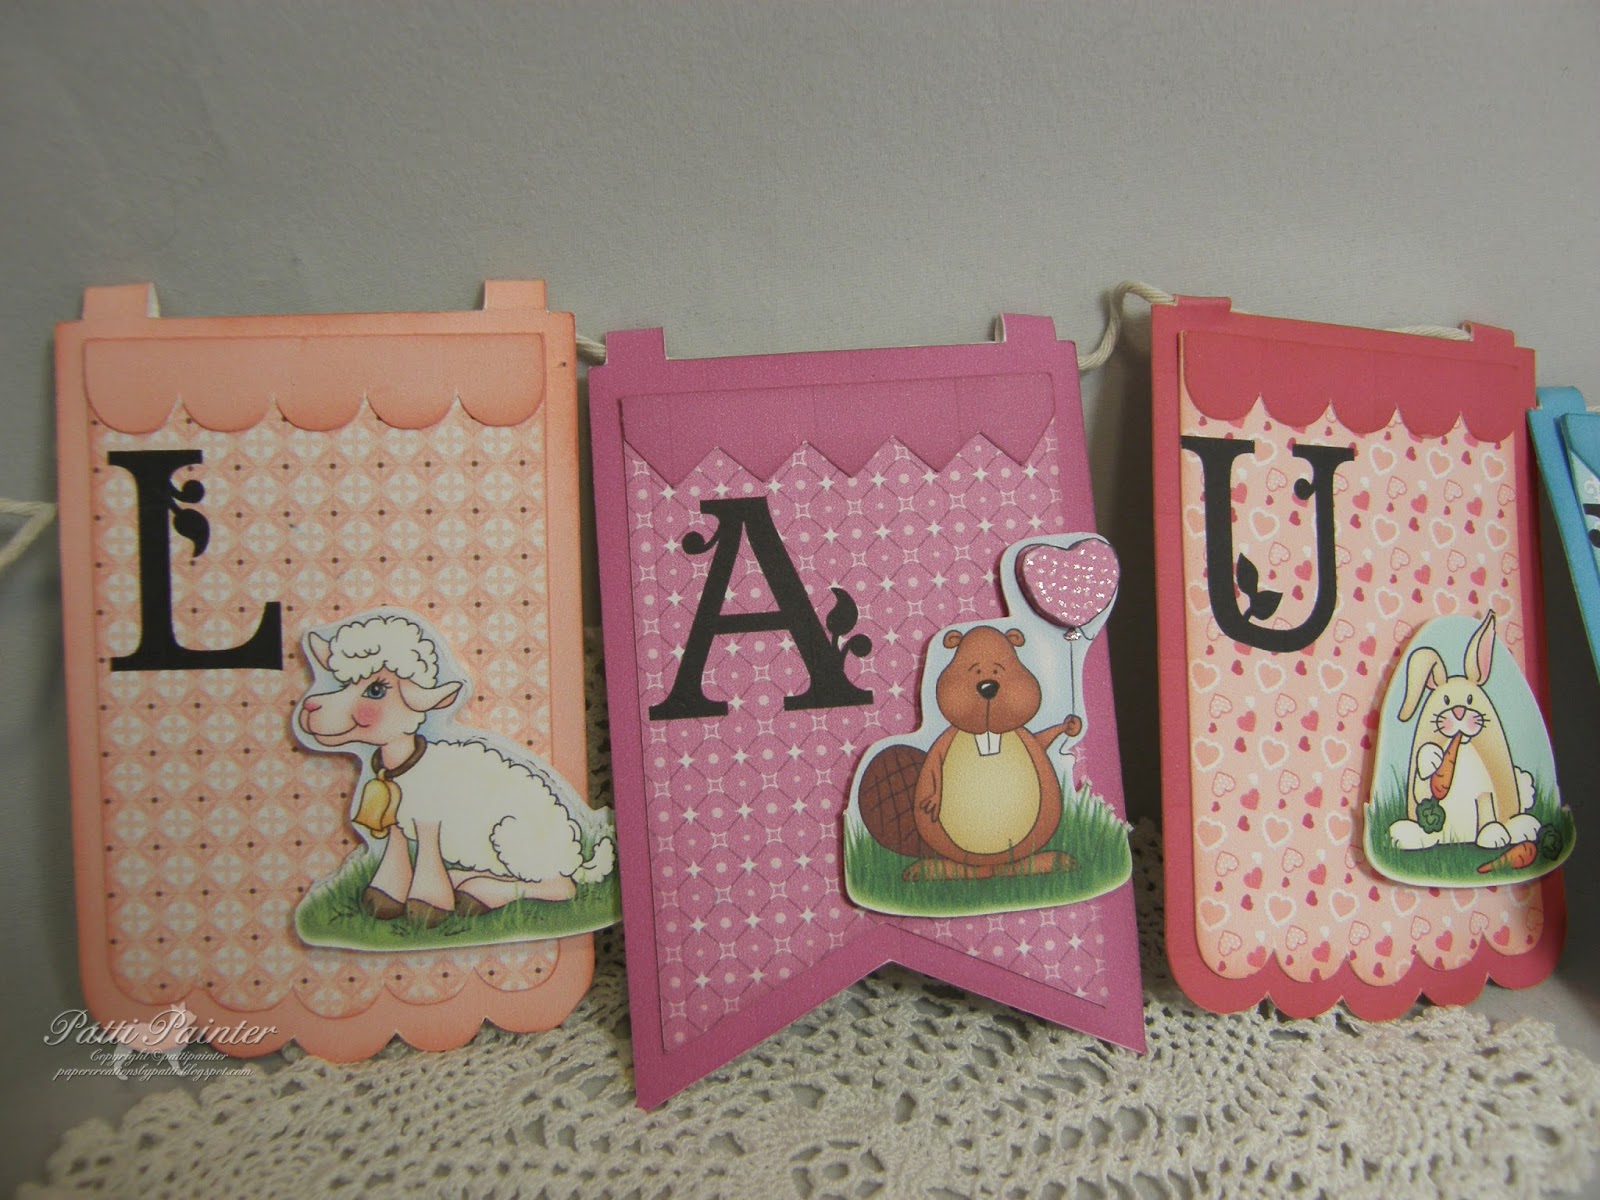
I created this banner to send to Lauryn.
Using Doodle Pantry's  Banner Banquets
SVG files along with digital papers and images from several
different sets including "Loving Critters", "Loving Lambs",
"Classy Monograms" and "Easter Peeps". 


I hope she will enjoy seeing this on her wall.


This last panel uses the beautiful word art created by Cec at Sugar Creek Hollow . You can get this by making a 
donation on Lauryn's blog. 

Thanks for stopping by today and enjoy the hop!
We appreciate your support of Lauryn!
Don't forget to leave a comment for the candy.
I will draw a name at Noon on Friday
April 18th using Random.org.

May God Bless.


I am entering this at
Anything But a Card Challenge #34 - Spring Forward
Doodle Pantry Challenge #45 April


Thursday, March 13, 2014

Stamplorations Sketch #7


I made a card for Sketch Challenge #7 at Stamplorations  using this fun sketch.


Using the Silhouette Cameo, I cut a floral border at the top and bottom
of a piece of ivory card stock. I then took distress inks in
peeled paint, mustard seed and worn lipstick which I sponged
over the cut border. I used both the negative and positive
parts of my cut, popping the negative up with foam dots.
My image is from an older Stampin' Up set , I colored
it with Spectrum Noir and Distress markers.
I stamped another image from the set in Versafine vintage sepia
for the inside of my card.


I added pearls to the border and butterfly on my tag from Want2Scrap.


If you aren't familiar with this fun challenge site, I hope this
will give you the nudge to go check it out.

Thanks so much for stopping by for a visit!


Thursday, January 30, 2014

What a Muse!


Can you believe I am playing again at Muse this week?
I couldn't resist this beautiful card by
Marion Vagg:


Isn't it gorgeous?????

I bet you can see what inspired me on this one,
I had this great cut file from Silhouette called Always and Forever Frame . I actually turned the tab and mounted it a bit differently from the original so that it would work with my lovely image from Magic Moonlight , be sure to sign up for the newsletter so that you won't miss any of her beautiful free images.

I changed the cut file into a print and cut using the color eye dropper to perfectly
match the colors to the flowers and blues in his outfit.

I used a chevron border also from Silhouette to do a direct print and cut on my 
background layer, then started layering all of my 
pieces using foam dots to give it dimension.
I sponged Worn Lipstick around my heart and cut this out twice, you
can never have too many hearts, right?

I did a slight offset around the sentiment and the flourish, which is also from 
the Silhouette store. Here is a side view so you can see the layers.


I trimmed the flourish to make it fit on my frame and was able
to use the leftover piece to accent the inside of my card.

So looking forward to giving this to my hubby on Valentine's Day!

As I said this is for Challenge #52 at Muse . 
Also for Sentimental Sunday Theme "Lovey Dovey" with a sentiment 

Hope you can check out these sites and maybe play along.

Have a wonderful weekend, it is suppose to be in the mid 50's 
for us, can you say heat wave???????????

Wednesday, January 1, 2014

Ringing in the New Year with Doodle Pantry


Happy 2014!

How about some cutie SVG files and images from Doodle Pantry to celebrate? I am using the just released Overalls and Baby Dress set which includes SVG files, PDF files for those without a digital cutter, outline and color images, JPEG and PNG images for paper piecing....all this for only $3.00! 
My first card uses the full A2 card size file. I used a yellow textured card stock for the base, cutting my pockets and front pieces from design paper, love the dimension with pop dots. The ric rac trim is from a set of precut borders by Martha Stewart that I have had forever. Love the way it looks on this dress. 

For these next two cards I used the same dress file along with the overall file and by dragging in digital papers from Baby Basics I was able to color and decorate my little boys overalls.
I used the color picker in my Cameo software to perfectly match the colors in the papers.
I use my software from the Cameo almost as often to manipulate
my digital images as I do to cut items. Makes it so very easy.
Love the button brads on the straps. I used pop dots to elevate the top layer
on both of these cards.

For my baby girl, I was able to use the set Baby Shoes  and the papers from
that same set. I also added a bit of the ric rac to my dress and some 
flower brads on the pockets.


I love how these all turned out and can't wait to try something more
with this fun set. I can see the dress used as an apron.....
you just never know what you will see.

Don't forget until the 3rd of January by using the code
HAVEFUN2014
you can save 40% off of your order with a minimum order of $2.00.

Also free with purchase get the set :


Also, enter the challenge at the DP blog starting at Noon today
using any Doodle Pantry image (sorry sentiments only do not count)
and you will get this set free.


Wishing you all the best in the upcoming year--hope you can join us
at Doodle Pantry.

Wednesday, December 11, 2013

A Layered Tree


I am cutting it a bit close but wanted to enter this card at the Silhouette Blog where the challenge this week is to use a holiday shape. Be sure to stop in for a visit and see the beautiful wreath that Jeana created. 

I used digital papers from Doodle Pantry (gingham layer), the other's and the postcard are from The Farmhouse Papers. Love the chipboard fa la la la la pieces.

I used the "5 piece Layered Tree" cut file from Silhouette. Love this file! I printed the full tree and then the layers in the two papers using foam dots to pop them up. I added a piece of corrugated cardboard for my tree trunk.

I also made a matching gift bag using only the full tree form. The mitten tag was made by taking a mitten cut file, mirroring and welding them together. 


I love playing with the images in my Cameo and the fantastic way my projects turn out.
Be sure to stop by the blog and see all of the inspirational projects created.

If you don't already own a Cameo, hope Santa sends one your way......

Monday, October 21, 2013

Tag Time....


Happy Monday!

I finally own some Mo Manning designs ! I have long loved the images she creates and a while back I finally purchased a few of my faves!

"What's Cooking?" is one of her most popular images and the adorable "Gingerbread Man" is a freebie!

These were so easy to make. I used a Silhouette Tag file, this one is simple but you will find so many great ones in the store.
First of all I created the fold over tag by taking the file, mirroring it and welding the two pieces together.
I then opened two more tags, one of which I filled with digital paper from Doodle Pantry.
The other tag has the What's Cooking image placed directly on it. I did a trace of the Gingerbread Man with offset and cut him out to mount on my tag.
Both of these were colored with Spectrum Noir markers. I glued the finished fronts directly to the folded tag.


Ever have those things you just stuck on? For now, it is tags for me, lol!

I am entering this at the Weekly Shape Challenge at the Silhouette Blog where the theme is to use any tag shape. 

thanks for stopping by and hope you have time to leave me a comment.
Take care....

Saturday, October 19, 2013

Some of my favorite things....


Mason jars, snowmen and pumpkins....what a combination but I love how they all came together.
Using a free digital image of a mason jar from Sweetly Scrapped and my Cameo I was able to create a fold over tag in the shape. I mirrored the jar and then welded the two together. I then took my images from Doodle Pantry , the Snowman Cheer which is a free set and the gorgeous set Pumpkin   along with leaves from the set Covered Bridges   I laid out my design on the jar images and also cut those using the Cameo.
I layered this layer on the tag but you could also just place your images directly onto the tags before cutting them out.

I made a set of 4 of each. The topper is part of a Silhouette file. I inked the edges of these and used foam dots to give some dimension. A hang thread was placed in the corners. 


I had fun decorating these in various ways, what a fun and quick way since I used the pre colored images by Laurie to add something extra to your packages  . Check out all of the great images at this site. She includes outlines and color images in most of her sets.

I am entering this in the monthly Challenge #39 at Doodle Pantry's Blog. 

I am also entering the pumpkin tags at Card Crafter's Circle and their In the Pumpkin Patch challenge.
Please stop by both of these blogs and take a look around. 

Happy Day......


Tuesday, September 24, 2013

Some Fall Decor....


Hello all, I know it has been a while since I have posted or visited with some of you in blogland, hope you all are having a great start to the Autumn season. It is my favorite season of all, as the colors, low humidity and great temps just suit me. It is also a time when I have lots of gatherings with friends and family and I do so look forward to that.

Rick and I have been super busy working on projects around the house and my crafting time has had to take a back seat to those for the time being but I do see the light at the end of the tunnel, so hopefully I will be posting more soon.

This is a 4 x 6 frame that was originally bright brass but as I have grown fond of using the oil rubbed bronze spray paint ( better not stand still too long, lol) and while freshening up some old brass lamps for my newly painted rooms I sprayed this little fella that I picked up at the local consignment shop.

All of my images are from the Silhouette online store. The Autumn subway art is from Kolette Hall,  the fall flourish is by Loni Harris and my leaves are cut from a file by Lori Whitlock. 
I ungrouped the subway art and colored them in fall shades as well as the fall border. I also did an offset of the border to create a background which I colored in a lighter shade.
The leaves were cut from some retired Stampin' Up double sided dsp. I used pop and glue dots to affix them to the frame and hemp twine, adding a few gems in lovely shades of brown and gold.

I love looking for items to re purpose while out shopping, don't you?

I am entering this at the Weekly Shape Challenge at the Silhouette blog, be sure and stop by, great tutorials and info on using your Cameo. This week's challenge was to use words or phrases in a new project. 


Thanks for stopping by.....

Thursday, August 22, 2013

Shapes and Silhouette


Just wanted to stop by and show you my new cover, yes they now have them in pink,yeah!

I dressed it up a bit with text and flowers and the idea came from this week's challenge at the Silhouette Blog where the weekly shape challenge is to use a shape in an unlikely way. I used the Pine Tree shape from the Silhouette store to create my flower. The file comes with both the trunk and tree, I deleted the trunk as I would not need it, re sized the pine tree (one of the first shapes I purchased) and replicated the shape around 12 times to get my blossom.
I then copied and pasted it 3 more times and re sized them to create my layers.
Here is a great video that Jeana did which explains is so well. I can't wait to try this with a card. 
Here is a closeup of the flowers.


Don't you love the button fabric, this is retired from Stampin' Up and so perfect for my Cameo cover.
 The word Create was made using the text tool and a font on my computer and also cut from a scrap of fabric.

Hope you can understand what I am trying so hard to explain and failing at I am afraid.
My advice is to watch the video and it will all be clear.

Have a wonderful day.


Tuesday, July 2, 2013

Just Add Ink


Happy Tuesday morning. While surfing around the other day I came across another sketch that I just couldn't wait to try at Just Add Ink and since I am so far behind in creating the Christmas cards that I had good intentions in creating at the first of the year so that I would be ahead come holiday time I decided to use it to add another to my stash. 


I am still loving my Silhouette Cameo and for this used a flourished frame I had purchased when I first bought my machine. I moved the inside cut line which created a background mat with the flourish and then used the inside cut line to create an inside mat out of the white card stock.

Stamping part of the beautiful bird stamp from the set "Beautiful Season" from Stampin' Up which I then colored using both Spectrum Noir and Copic markers and added a piece of twine to complete.
By lifting the layers with foam dots it gave it some depth-here is a side close up view. 


Thanks for stopping by today. I hope you will stop by Just Add Ink, the design team created some beautiful inspiration pieces. 

Hugs.....

Card Details:
Paper: GinaKDesigns base weight white, unknown textured red 
Stamps: Stampin' Up Beautiful Season
Other: Silhouette Cameo flourish frame, Teresa Collins twine, Spectrum Noir and Copic markers, Versafine onyx black ink

Sunday, February 10, 2013

Seize the Birthday Sketch #5


I am having a blast playing along with the sketch challenges at Seize the Birthday ! Every two weeks, a new sketch goes up with a card for week 1 being created with a feminine flair and week 2, masculine. A great way to grow your birthday card stash with no effort.


For my feminine card this week, I used a cut file that I picked up a while back and hadn't used as yet....love this flower pot! the leaves and part of the flowers are an insert.


My silhouette stamp and sentiments are from Stampin' Up's set "Vintage Labels" and"Just Believe". I also stamped the centers of the flowers with Distress Inks Worn Lipstick and a stamp from "Vintage Vogue".  I used the brick embossing folder sponged with rusty hinge and a white ink to create my cloudy sky.

I hope you will check out this great new blog and their fun challenges. I would also like to thank the team for choosing my card last week for "Birthday Honors".

Have a great day....


post signature

Wednesday, February 6, 2013

Muse Challenge #3


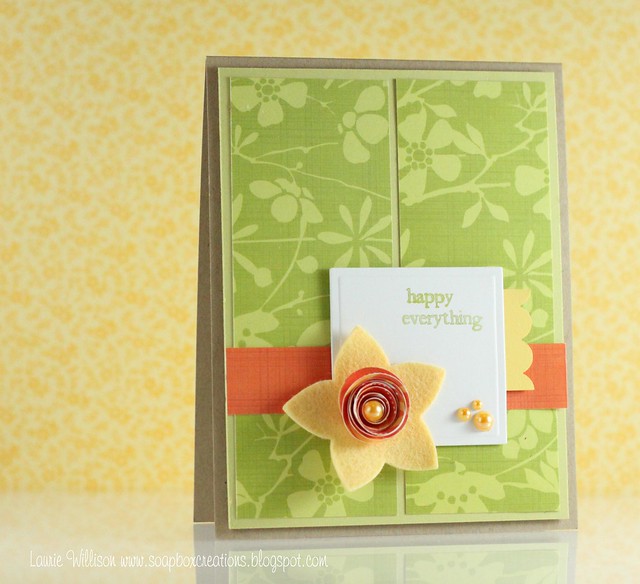
I am excited to again be playing at the Muse Card Club for their Challenge #3 using this beautiful card by Laurie Willison as our inspiration point!


                                           IMG_9768_edited-1

If you haven't seen this new take on challenges, please stop by and take a look!

Here are the simple rules:

Use the Muse card as inspiration, explain your interpretation and link back to Muse
Provide supportive comments to at least 3 of your fellow member's submissions
Vote for 3 of your fellow member's submissions that you find inspiring.

I was inspired by the beautiful vines and flowers  and the two background panels as well as the large flower and gorgeous orange color.


I  switched the floral paper to my background letting it peek through my cut vines
which were cut with the Cameo. I sponged Tim Holtz distress inks in rusty hinge
and spiced marmalade on a dictionary page afterward die cutting it with 
Spellbinders carnation collection dies.

Hope you take time to check this out, I know you will love it!


post signature

Sunday, January 27, 2013

Another Sketch


Have you been playing along at the new challenge blog Seize the Birthday ?  They are on to sketch #3 which means we are working with a feminine card this week. 


They use the same sketch two weeks in row with the first card being created in a feminine fashion and the next week-masculine. Isn't that a great way to build up your stash of birthday cards.

I am selling my cards in a couple of local shops and seems like lately since I wasn't playing in very many challenges I was struggling to keep enough to stock my racks, so I have made 
a decision to try and get back into playing more. It also helps with my mojo and that 
never hurts!

I have wanted to try a pinwheel for quite some time, so with that in mind I went shopping at the 
Silhouette store and found this goodie. Don't these Echo Park papers make you smile?
I created the balloons by punching a one inch circle and attaching some twine.
The button brad was a perfect color match, that also makes me happy!


I love to use some of my scraps to decorate the inside, for this I wanted to keep it clean and simple.


Don't miss out on this fun new blog, go on, you know you what to play.....

Card Details:
Paper: Stampin' Up baja breeze, Echo Park "So Happy Together"
Silhouette pinwheel cut file
Making Memories button brad, 1"circle punch, SU white twine
SU stamps "Stem Sayings"


post signature

Friday, January 11, 2013

Vintage Bubbles....


Hello my friends and I see that I have gained a few new followers, 
thank you so much for taking the time to 
stop in and look around as you have time...I really
appreciate you and the comments you leave.

Doesn't this look like a great place to be?
All snuggled down in those bubbles.....

This is one of Laurie's new images this month
This is one of my first attempts at tracing an image and 
cutting it out with my Cameo. I probably should have 
tried an image without so many intricate areas but 
I was not too unhappy with the way it came out.
I think it gives a great backdrop for the tub.
The image for my inside sentiment is also from this great set.

Vintage Tub

The team has merged some of Doodle Pantry's 
other images with the tub and they look so cute!
Such versatility with this great vintage image!
Be sure and stop by for a look at this 
month's release.


I also want to remind you to stop by the Doodle Pantry Blog and join in this month's challenge.

Did you notice my new blog header and background?
 With the help of Emily at Sweetly Scrapped and her sharing of this beautiful header which you can find by clicking here (and by the way it is free)  I used my
new My Digital Studio program and lots of Stampin' Up images to add my own
flavor to it and tada...this is what I came up with. 
I have been using Sharon at Plumrose Lane to create my headers and signatures for the last couple of years and  you will still be seeing those beautiful designs but for a change
and actually just to see if I could do it, I gave it a try.
The beautiful background is from Sharon (free!) and I suggest you stop by both of these
lovely ladies sites and you will be lost for ages taking in all of
the beautiful things.
Thanks Emily and Sharon....couldn't have even begun to do it without you!


Card Details:
Paper: Stampin' Up basic gray, Glitz dsp "Pretty in Pink"
Other: Dollar Tree satin ribbon, American Crafts ruffled ribbon,Spectrum Noir Markers

post signature